Spring AI 入门教程:构建你的第一个 Spring AI 应用

random-pic-api

简介

本文是 Spring AI 入门教程的第一部分,将带你从零开始搭建一个 Spring AI 应用,集成 OpenAI(通义千问兼容模式)和 Anthropic(Claude)两个聊天模型,并解决实际开发中可能遇到的各种问题。

参考文档:Your First Spring AI 1.0 Application

刚刚新开了一个 Spring AI 的 教程项目, 欢迎大家 star 和 fork!
20251122223948_L3kX1o1E.webp

准备工作

在上一篇 在 Docker 中部署 PostgresML 实现数据库内机器学习 中,已经成功在 PostgresML 中创建了数据库,并成功进行了 PostgresML 的相关测试。现在我们将以 PostgresML 为底层数据库,基于 Spring AI 来完成一个示例项目,学习 Spring AI 的相关概念以及 API 的使用。

项目初始化

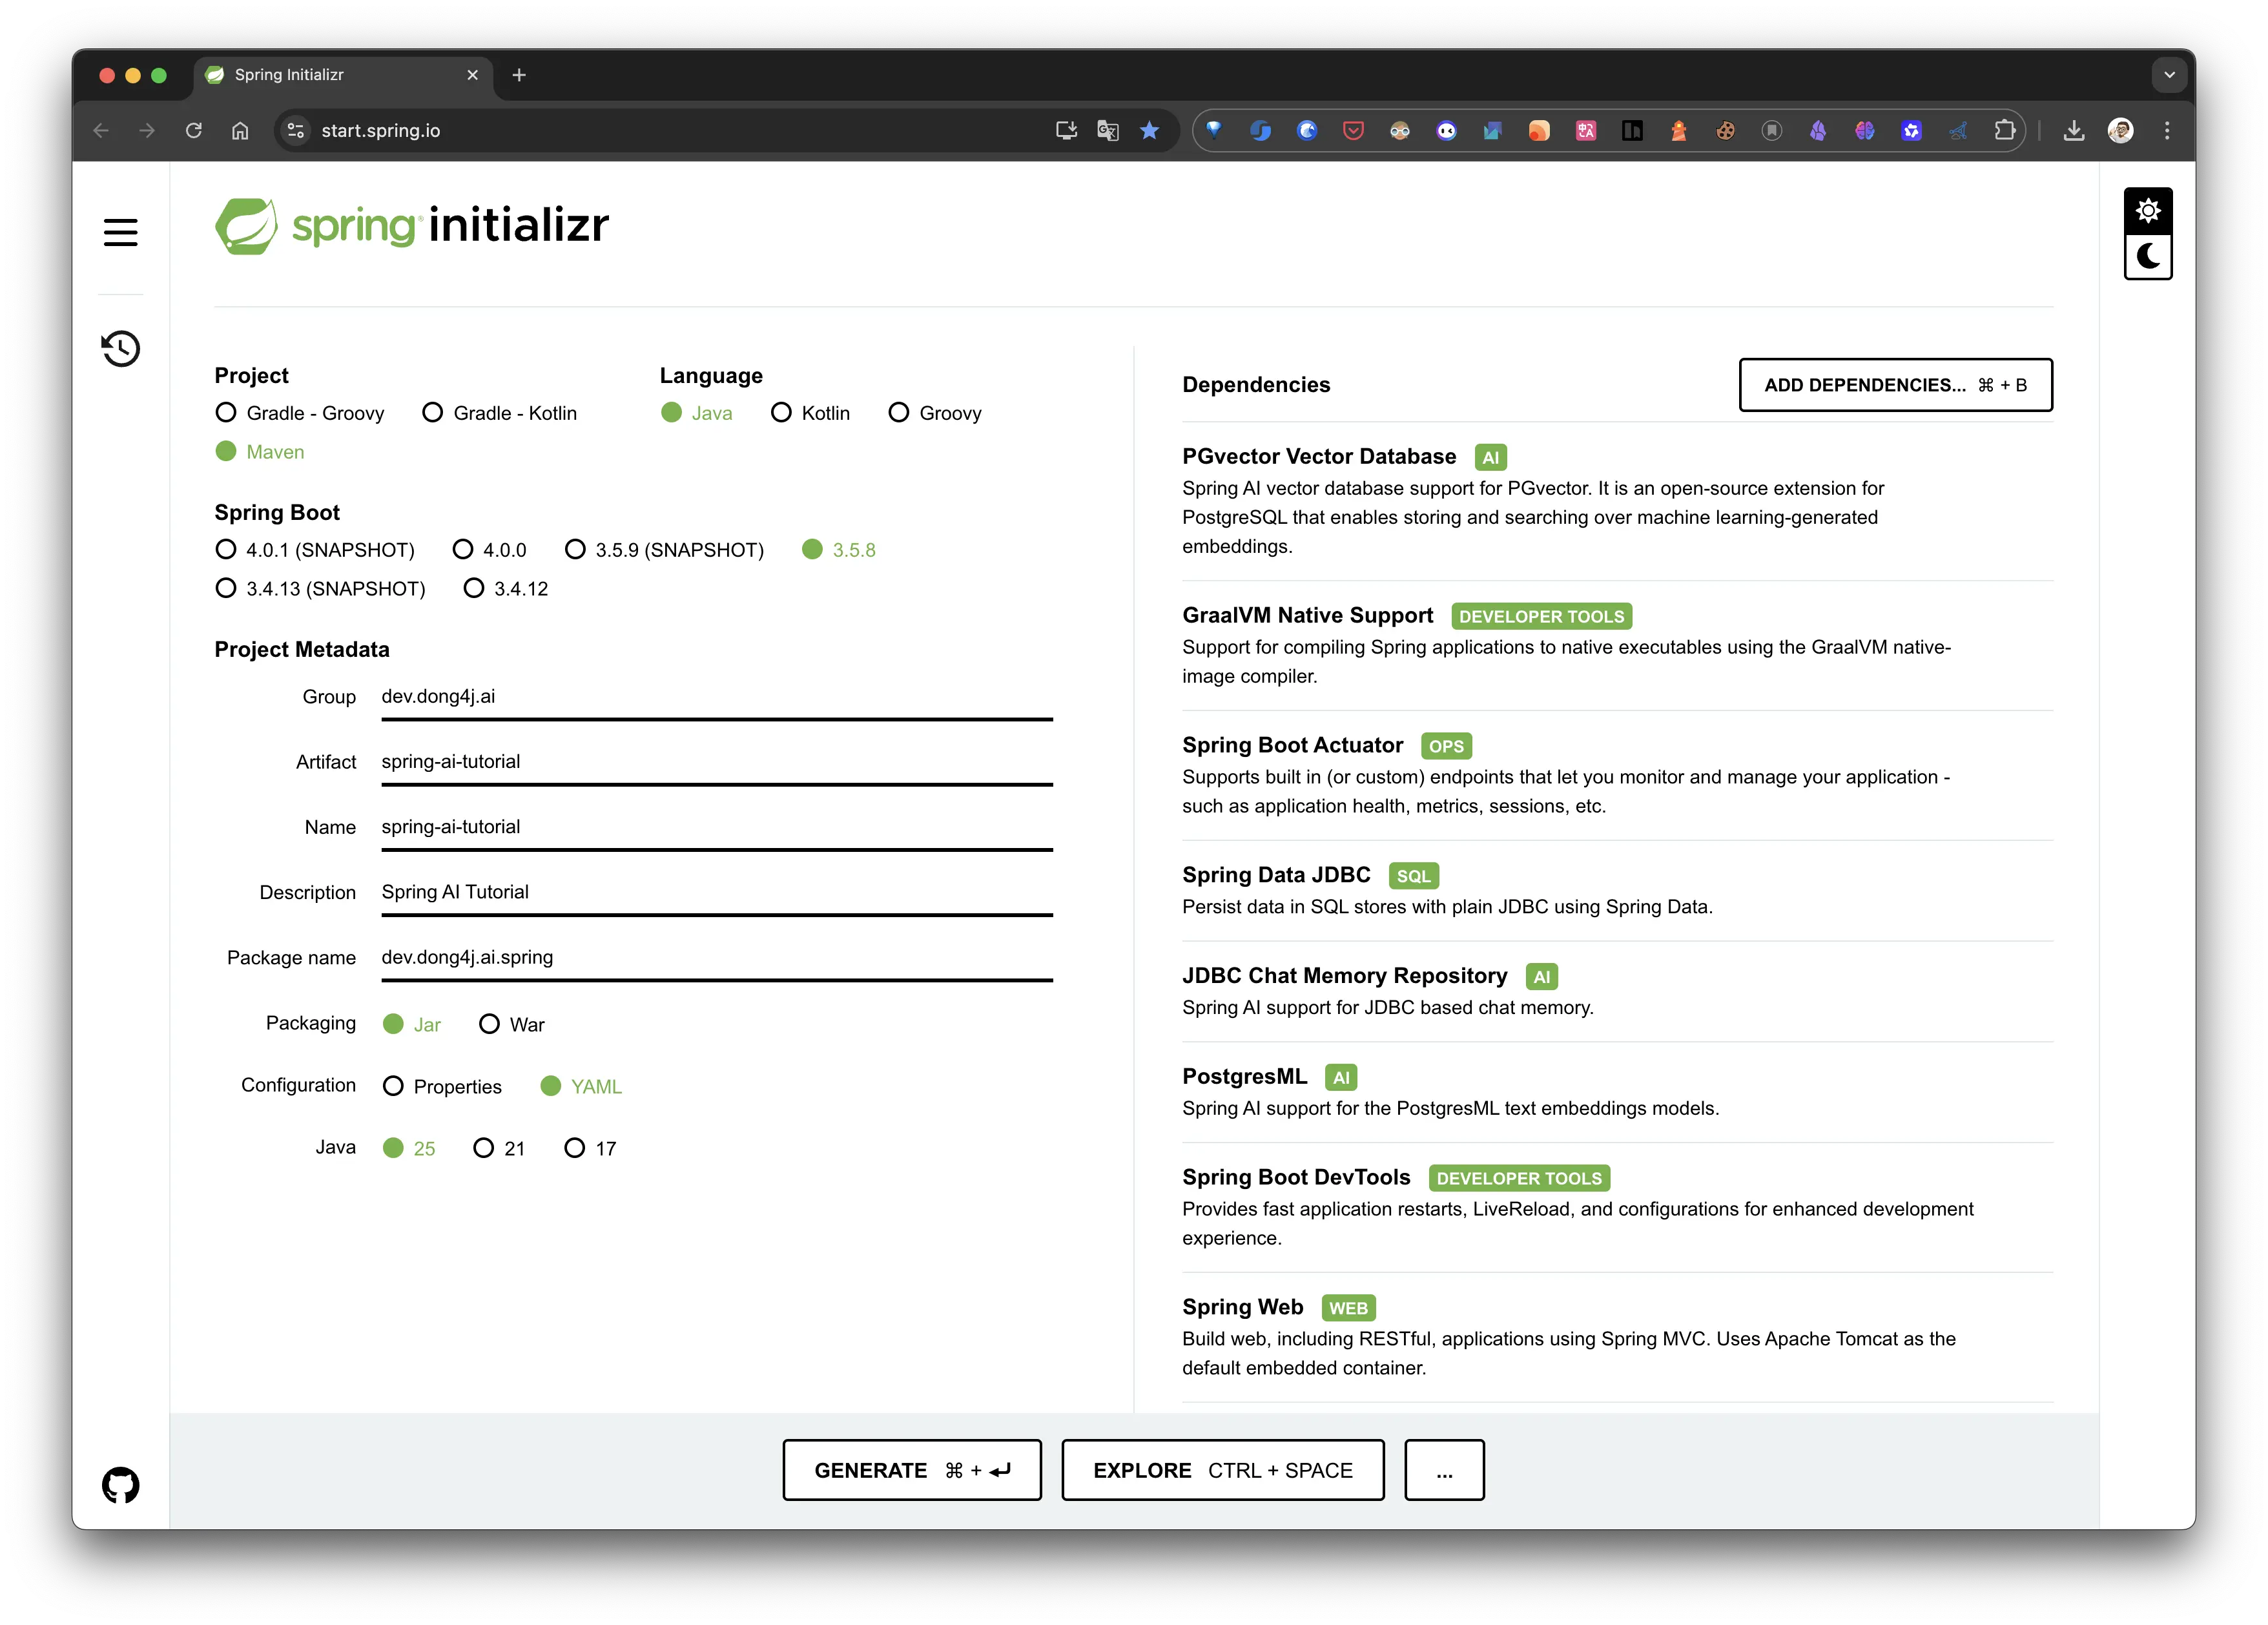
打开 Spring Initializr,在你的项目里添加以下依赖:

  • PgVector (PostgreSQL 的向量扩展)
  • GraalVM Native Support (GraalVM 原生镜像支持)
  • Actuator (应用监控)
  • Data JDBC (Spring Data JDBC,用于数据库操作)
  • JDBC Chat Memory (用 JDBC 存储聊天记忆)
  • PostgresML (在 PostgreSQL 中运行机器学习模型,这里主要用它的 Embedding 功能)
  • Devtools (开发工具,热重载)
  • Web (构建 Web 应用,比如 Spring MVC)

此外,还需要在 pom.xml 中手动添加以下依赖:

1
2
3
4
5
6
7
8
9
10
11
12
<dependency>
<groupId>org.springframework.ai</groupId>
<artifactId>spring-ai-advisors-vector-store</artifactId>
</dependency>
<dependency>
<groupId>org.springframework.ai</groupId>
<artifactId>spring-ai-starter-model-openai</artifactId>
</dependency>
<dependency>
<groupId>org.springframework.ai</groupId>
<artifactId>spring-ai-starter-model-anthropic</artifactId>
</dependency>

20251122222715_Y2I5y5oU.webp

数据库设置

application.yml 中配置数据库连接和 Spring AI 相关设置:

1
2
3
4
5
6
7
8
9
10
11
12
13
14
15
16
17
18
19
20
21
22
23
24
25
26
27
28
29
30
31
32
33
34
35
36
37
38
39
40
41
42
43
44
45
46
47
48
49
spring:
application:
name: spring-ai-tutorial

# 总是执行数据库初始化脚本
sql:
init:
mode: always

# 数据库连接信息
datasource:
url: jdbc:postgresql://localhost:5434/postgresml
username: postgres
password: password

# PostgresML Embedding 相关配置
ai:
model:
# ⚠️ 重要:因为引入了 openai, 也会带一个 openAiEmbeddingModel, 会与 postgresMlEmbeddingModel 冲突
# 这里强制指定为 postgresml
embedding: postgresml
postgresml:
embedding:
create-extension: true # 自动创建扩展
options:
vector-type: pg_vector # 向量类型

# OpenAI 配置(通义千问兼容模式)
openai:
base-url: https://dashscope.aliyuncs.com/compatible-mode
api-key: ${QIANWEN_API_KEY}

# Anthropic 配置(Claude Code Router 转发)
anthropic:
api-key: ${ANTHROPIC_AUTH_TOKEN}
base-url: http://127.0.0.1:3456

# PgVector 向量存储相关配置
vectorstore:
pgvector:
dimensions: 768 # 向量维度
initialize-schema: true # 自动初始化 Schema

# JDBC 聊天记忆相关配置
chat:
memory:
repository:
jdbc:
initialize-schema: always # 自动初始化 Schema

获取 API Key

通义千问 API Key

通义千问提供了多种获取 API Key 的方式:

  1. 官方渠道:访问 阿里云 DashScope 注册并获取 API Key
  2. 免费测试:可以使用一些第三方平台提供的免费 API Key 进行测试,例如:
    • 访问 ModelScope 注册账号
    • 在控制台中申请免费的 API Key
    • 将 API Key 配置到环境变量 QIANWEN_API_KEY

Anthropic API Key

如果你使用 Claude Code Router (CCR) 进行代理,API Key 可以在 CCR 的 UI 界面中设置。关于 CCR 的配置,我们会在下一节详细说明。

配置聊天客户端

创建配置类

创建一个配置类 ChatClientConfig.java 来配置不同的聊天客户端:

1
2
3
4
5
6
7
8
9
10
11
12
13
14
15
16
17
18
19
20
21
22
23
24
25
26
package dev.dong4j.ai.spring.config;

import org.springframework.ai.anthropic.AnthropicChatModel;
import org.springframework.ai.chat.client.ChatClient;
import org.springframework.ai.openai.OpenAiChatModel;
import org.springframework.ai.openai.OpenAiChatOptions;
import org.springframework.context.annotation.Bean;
import org.springframework.context.annotation.Configuration;

@Configuration
public class ChatClientConfig {

@Bean
public ChatClient openAiChatClient(OpenAiChatModel chatModel) {
final OpenAiChatModel build = chatModel.mutate().defaultOptions(OpenAiChatOptions.builder()
.model("qwen2.5-14b-instruct")
.temperature(0.7)
.build()).build();
return ChatClient.create(build);
}

@Bean
public ChatClient anthropicChatClient(AnthropicChatModel chatModel) {
return ChatClient.create(chatModel);
}
}

重要注意事项

⚠️ 通义千问 API 兼容性限制

通义千问虽然提供了 OpenAI 兼容模式的 API,但在某些方面存在兼容性限制:

  1. 思考模型(Think Model)的问题
    • chatModel 默认使用非流式响应
    • 如果使用思考模型(think model),会报错
    • 原因:通义千问的 enable_thinking 参数必须设置为 false,且该参数需要直接在请求体顶层,而不是嵌套在 extra_body
    • Spring AI 的 extraBody 方法会创建嵌套的 extra_body 对象,这是 OpenAI API 的结构,但通义千问 API 不支持这种嵌套结构

问题示例

1
2
3
4
5
6
7
8
9
10
11
// Spring AI 的 extraBody 会生成这样的结构(不符合通义千问 API)
{
"extra_body": {
"enable_thinking": false
}
}

// 通义千问 API 需要这样的结构
{
"enable_thinking": false
}

当前解决方案

  • 暂时不使用思考模型
  1. 模型选择
    • 推荐使用 qwen2.5-14b-instruct 等非思考模型
    • 避免使用带有 think 标识的模型

⚠️ Embedding Bean 冲突问题

引入 spring-ai-starter-model-openai 后,Spring AI 会自动装配一个 openAiEmbeddingModel Bean,这会与 postgresMlEmbeddingModel Bean 产生冲突。

解决方案:在 application.yml 中显式指定使用 PostgresML 的 Embedding:

1
2
3
4
spring:
ai:
model:
embedding: postgresml

如果不设置,启动时会报错:

1
2
3
Parameter 0 of constructor in ... required a single bean, but 2 were found:
- openAiEmbeddingModel
- postgresMlEmbeddingModel

使用 Claude Code Router 代理 Anthropic API

Claude Code Router (CCR) 是一个开源工具,允许你在本地代理 Anthropic 的 API 请求。这对于在国内无法直接访问 Anthropic API 的开发者来说非常有用。

安装步骤

  1. 安装 Node.js:确保你的系统已安装 Node.js(推荐使用 LTS 版本)

  2. 安装 Claude Code Router

    1
    npm install -g @musistudio/claude-code-router
  3. 启动服务

    1
    ccr start

    默认会在 http://127.0.0.1:3456 启动服务

  4. 配置 API Key

    • 访问 CCR 的 Web UI(通常是 http://127.0.0.1:3456 或相关端口)
    • 在界面中配置你的 Anthropic API Key
    • 或者编辑配置文件 ~/.claude-code-router/config.json
      1
      2
      3
      4
      5
      6
      7
      8
      9
      10
      11
      {
      "providers": {
      "anthropic": {
      "apiKey": "your-anthropic-api-key",
      "baseURL": "https://api.anthropic.com"
      }
      },
      "router": {
      "default": "anthropic"
      }
      }
  5. 在 Spring AI 中使用
    application.yml 中配置:

    1
    2
    3
    4
    5
    spring:
    ai:
    anthropic:
    api-key: ${ANTHROPIC_AUTH_TOKEN} # 可以在 CCR UI 中设置
    base-url: http://127.0.0.1:3456

创建测试控制器

创建一个简单的控制器来测试聊天功能:

1
2
3
4
5
6
7
8
9
10
11
12
13
14
15
16
17
18
19
20
21
22
23
24
25
26
27
28
29
30
31
32
33
34
35
36
37
38
39
package dev.dong4j.ai.spring.controller;

import org.springframework.ai.chat.client.ChatClient;
import org.springframework.stereotype.Controller;
import org.springframework.web.bind.annotation.GetMapping;
import org.springframework.web.bind.annotation.PathVariable;
import org.springframework.web.bind.annotation.RequestParam;
import org.springframework.web.bind.annotation.ResponseBody;

import jakarta.annotation.Resource;

@Controller
@ResponseBody
class AdoptionsController {

@Resource
private ChatClient openAiChatClient;

@Resource
private ChatClient anthropicChatClient;

@GetMapping("/anthropic/{user}/assistant")
String anthropic(@PathVariable String user, @RequestParam String question) {
return anthropicChatClient
.prompt()
.user(question)
.call()
.content();
}

@GetMapping("/openAiChatClient/{user}/assistant")
String openAiChatClient(@PathVariable String user, @RequestParam String question) {
return openAiChatClient
.prompt()
.user(question)
.call()
.content();
}
}

测试应用

启动应用后,可以通过以下接口进行测试:

测试 OpenAI(通义千问)接口

1
curl "http://localhost:8080/openAiChatClient/test/assistant?question=你好,请介绍一下你自己"

测试 Anthropic(Claude)接口

1
curl "http://localhost:8080/anthropic/test/assistant?question=你好,请介绍一下你自己"

总结

通过本文,我们完成了以下工作:

  1. ✅ 搭建 Spring AI 项目基础结构
  2. ✅ 配置 PostgresML 作为向量数据库和 Embedding 模型
  3. ✅ 配置 OpenAI(通义千问兼容模式)聊天客户端
  4. ✅ 配置 Anthropic(Claude Code Router)聊天客户端
  5. ✅ 解决 Embedding Bean 冲突问题
  6. ✅ 了解通义千问 API 的兼容性限制
  7. ✅ 创建测试接口验证功能

下一步计划

  • 集成 RAG(检索增强生成)功能
  • 实现 Tool Calling 功能
  • 集成 MCP(Model Context Protocol)
  • 构建 AI Agent 应用

参考资料